Hunter Node Irrigation Control

What is a Hunter Node

The Hunter Node was first introduced by Hunter Industries in 2012.  The Hunter Node is a 9 volt battery power control unit that can be used to operate any size Hunter Valves using a 9 volt dc latching solenoid The Hunter Node is available as 2 options.  A Hunter Node 100 which comes with the Hunter solenoid valve and the Hunter 400 which can control up to 4 valves however the valves have to be purchased as a separate item.

When Would you Use A Hunter Node

In most situations we would suggest that you use the industry standard 24 volt ac valves with a mains powered control unit.  These are by far the cheapest and most reliable method of controlling your irrigation system.  However there are occasions when this is not possible.  As an example a remote location on a gold course or garden or sometimes the inconvenience that is associated with installing a low voltage lead to a valve box after landscaping has been complete.  In these situations the Hunter Node is ideal.  The valve is installed in to the line that needs to be controlled and after a few key clicks it is ready to run.

What Is The Difference Between The Hunter Node 100 and 400

The Hunter Node 100 comes complete with the solenoid valve.  This is pre wired and pre fitted ready to thread in to any Hunter Solenoid valve.

The valve once installed is compact and very easy to operate

The Hunter Node 400 is used to control any number of valves up to 4.  The 400 is just the control unit and to this you would need to add the valves with the dc solenoids.  The example below is operating three of the Hunter 1″ BSP valves

In Order for the above to operate you would have to purchase in addtion to the control unit

Three Dc Latching Solenoids and three valve bodies

Porous Pipe Compared To Pressure Compensated Leaky Hose

Porous pipe

Porous pipe or leaky pipe that looks like rubber with lots of holes in is made from recycled tyres along with other material.  The pipe drips along its entire length however there is no control or calculation that can be put on the pipe as the drip is very random because of the nature of the pipe.  What this means is that we cannot be sure how much can be used before the water pressure falls below a certain level which would then leave the pipe dripping at the beginning of the pipe but with little or no water dripping out at the far end.

When porous pipe is used with hedging over a long length we can see after a few years the erratic dripping as the hedge grows at an erratic speed with plants near the source receiving more water than those at the end of the pipe.

Porous pipe drips along its entire length which again is not the ideal as water spreads under the soil surface and so to much water is applied over the length of the pipe.

Porous pipe can clog easily and this again leaves us with erratic watering patterns that can leave areas totally dry

Pressure Compensated drip pipe. 

Unlike porous pipe pressure compensated drip pipe leaks at a uniform rate.  We can apply calculations to the pipe and know for certainty how much water is being applied per square metre.  We know that the same amount of water will be applied to the first and last plant in the run.  With pressure compensated drip pipe we know that the volume of water applied to the bed , border or hedge will not fall along the run.  Pressure compensated drip pipe leaves the majority of the soil surface dry which reduces the amount of evaporation and reduces the amount of annual weeds that can germinate.  Pressure compensated drip pipe has had years of research and development put in to the product and is the most used drip pipe Worldwide because it can be used commercially with confidence


What Is The Difference Between A Pressure Releif Valve And a Pressure Regulator

A pressure releif valve is a valve that will open when the pressure exceeds a certain level and once open will allow water to bypass the system and return the water to the tank. These are installed in very high pressure systems and will protect the pipe and equipment etc.  They will protect pumps as they will make sure that water continues to move through the pump even if a fault occurs that prevents water from running ie a valve fails to open and the pump would eventually start boiling the water in the pump causing permanent damage


A pressure regulator will regulate the pressure on the outlet of the regulator and make sure that the pressure does not exceed the pre set amount. So the regulator will make sure that any equipment connected to the outlet of teh regulator is protected however pressure will be build up on the inlet

What Size Pipe Should I Use For My Pop Ups

What happens when water is pushed through up water pipe

The correct pipe diameter is decided based on the amount  the volume of water being used or the flow through the pipe. When water is pushed along a pipe friction is created. The amount of friction depends on the speed the water the water needs to move along the pipe in order to supply the volume of water at the outlet.  This loss in flow is called friction loss.  There are other factors that will contribute to flow and pressure loss, as an example elbows etc however for this example we will assume a straight run with no connectors

How large is the variation

In the example below we will assume that we are going t be using 2500 litres per hour at the outlet and that the total length of the pipe is 100 metres.  We will assume that our pump is delivering 4500 litres per hour in to the pipe at 5 bar pressure

In figure 1 we are supplying 4500 litres per hour at 5 bar pressure and we have opened the tap to allow 2500 litres per hour to exit.  In order for the 2500 litres per hour to exit the pipe the water will move with a velocity of 1.9 metres per second.  Velocities at over 1.5 metres per second should always be avoided as this can cause water hammer.  Over the 100 metre length we will see a loss of 2.16 bar pressure due to the internal friction of the pipe.  So the pressure at the exit would = 5 – 2.16 = 2.84 bar.


In Figure 2 we are supplying exactly the same amount of water at the same pressure however the external pipe diameter is now 32 mm and the pipe wall thickness is exactly the same.  In order to supply the 2500 litres per hour at the outlet the water will need to travel at 1.1 metres per second.  The friction loss in the 32 mm pipe is 0.54 bar over the 100 metre length so our outlet pressure will be 5 – 0.54 = 4.46 bar.  From this we can see that with a slight change in pipe diameter we have a huge energy saving.

If we were to increase the diameter of the pipe to 50 mm we would see a 0.19 bar pressure drop based on the above figures making this the most efficient option however cost wise it would not be the prefered choice, the 32 mm dimeter pipe would be the prefered option.

What size water pipe should I use

You now having an understanding of what happens when you run water through a water pipe.  From this information you can now decide on the diameter required however there are numerous other variable that will change your calculations, for example elbows, turns, type of pipe and wall thickness of the pipe.  Our advice is to email us at [email protected] or call us on 01189736905 so that we can calculate your requirements preventing expensive and time consuming mistakes


Pressure Compensated Drip Pipe

Pressure Compensated Leaky Hose The Professionals Choice Of Drip Pipe

This is a pressure compensated leaky hose and offers a very even and reliable coverage compared to other makes of leaky hose.  For more information concerning pressure compensated leaky hose please click the link below

Example of a header

If you would like to watch a brief video about Netafim please click here
Please click here to watch a brief video explaining how to use a push fit fitting

The diagram below should give you a visual ideal how drip pipe works

Pressure compensated drip pipe has a dripper inside the pipe at either 30 or 50 cm spacing.  The drippers are pressure compensated which means that the same amount of water will drip from the first to last dripper ( 1.6 LPH) even if the pipe is running up or down hill.  This is achieved using a filter.  When water is dripped on to the soil water spreads between 50 and 60 cm in diameter.  The surface stays quite dry however under the soil as per the side profile we can see the water spreading.  Providing the drip pipe is operated for 30 minutes per day, every day the soil will stay damp and plant will thrive.  On top of this because the soil surface is dry there is reduced germination of annual weeds and less evaporation that is associated with spray irrigation as much of the water is used to cool the soil. Added to this benefit the foliage and flowers of the plants do not become damage as the water is applied to the soil surface

Watering A Border Using A Header Pipe

Below is an example of how Netafim should be laid out so that wider borders can be watered.  The example below would water the complete border 1.5 meters in width by the length of the pipe.  So if we assume the border below is 10 meters in length then 30 meters will water 15 square meters

Use drip irrigation every day for 30 minutes

Drip irrigation should be used for 30 minutes every day.  The reason is because the soil is being used like a sponge.  If you take a dry sponge and pop it under running water you will see that most of the water runs off.  Now get the same sponge soak it with water and ring it out.  Pop the sponge back under the flowing water and you will see that most of the water is absorbed by the sponge

Although it may seem very satisfying to water by hand, if you dig into the soil when you’re finished you will find only the top inch or so is wet. Most of us don’t have the patience or time to water properly by hand. Giving a 20×3-foot vegetable bed the inch or more of water it needs during the heat of summer would leave you holding the hose for almost a half an hour (assuming your hose can deliver 2 gallons per minute). Even if you had the patience required, the water flows so fast, much of it runs off along the soil’s surface rather than sinking in.

Using a sprinkler also has several disadvantages compared to drip irrigation. Sprinkling increases the spread of plant diseases, especially if you water in the evening when leaves have less chance to dry off quickly. Sprinkler irrigation also uses more water than drip irrigation, wastes water on weeds in the rows and creates muddy paths. Your best bet is drip irrigation. —Steve Reiners, Ph.D., associate professor of horticultural sciences, Cornell University.

How Many Pop Ups Will I need And What Location Should I put Them In

The correct way to layout a pop up lawn watering system is to arrange the pop ups so that they throw the water in to the middle of the lawn rather than running them down the centre of the lawn throwing water out at 360 degrees.  In other words pop ups should be if possible located on the edge of the lawn as per the diagram below.


Pop ups installed in this way water the lawn more efficiently as the area that we want to water receives the water and little or no water is wasted with over spray.  This is even more important with paths and patios as when you spray water repeatedly on to a smooth stone surface  a clear bacteria can develop that forms almost like a think jelly like film which is very slippery.  Over longer periods of time the stone could develop algae or moss and this again would look messy.


In the simple examples above we can see that the picture on the left is throwing water in to the centre of the lawn while the picture on the right is an example of central 360 degree rotors that will water the same area.  On the right hand picture we have assumed the patio is at the bottom end and used a 180 degree nozzle as I am sure that at the very least patio furniture etc should stay dry

When watering near a drive  we again want to throw the water away from the drive as water sprayed on to a tarmac drive will encourage moss or if cars are parked on the drive we would soon see streaks for on the cars unless we were using recycled rainwater.

How Close together should we put a pop up

Some companies suggest the 3 or point rules however this put a huge amount of water on per square metre and ultimately adds more zones.  What we think is the best alternative is to use a pop up that applies water evenly to start with like the MP Rotator in a pro spray body and space the bodies at intervals equivalent of the radius of the spray as per the example below.  The pop up in the example has a radius of 5 metres ( the central pop up has a radius of 5 metres and a diameter of 10 metres.  So the pop up bodies are spaced 5 metres apart starting and finishing in the corners at 90 degrees


Pop Up Lawn Watering For Large Lawns

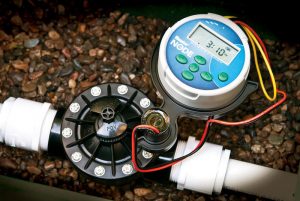
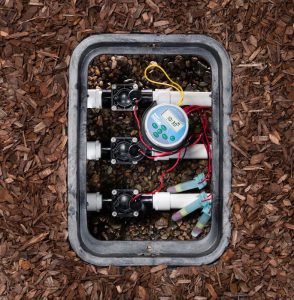
Pumps and Tanks For Large Lawns

A large lawn will need to be watered using a pump with a tank.  The reason for this is so that we can have a reliable higher pressure and a higher reliable flow.  The reason for the higher flow and pressure is so that we can run more pop ups from one zone and cover the area that needs watering efficiently.

There are a lot of thing to consider prior to buying a tank and a pump and this will be covered in more detail later however here is a basic example to give you an idea.

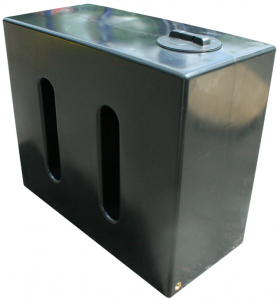
What size tank do I need

Tanks come in many shapes and sizes and prior to buying a tank we would need to know how much water we are using and how quickly we can fill the tank while the water is being used. The example below will give you an idea of the maths used however even this can vary as many timers can have delays programmed in which will delay the start between zones in order to allow the tank to refill.  In the example below we will assume we want to keep the tank as small as is possible

In this example we will have 4 zones watering the lawn.  We will assume the tank is filled by the mans water supply and that it is filling at the rate of 500 litres per hour.  We will assume that each zone will run for 30 minutes

Zone 1 uses 3500 litres per hour

Zone 2 uses 2500 litres per hour

Zone 3 uses 3500 litre per hour

Zone 4 uses 2500 litre per hour

Assumed information

1  The tank is filling at 500 litres per hour

2  Each zone will run for 30 minutes

If zone 1 comes on at 5 am and runs for 30 minutes it will require 1750 litres of water.  In that 30 minute period we know that the tank will receive 250 litres from the main.   In order for zone 1 to run completely without running out of water we would need a tank with a minimum volume of 1500 litres.

If zone 2 were to start up straight after zone 1 and our tank was only 1500 litres then it would run out of water straight away.  At this point we could decide to purchase a larger tank or to programme a delay prior to starting zone 2.  To fill the tank the delay would have to be 3 hours in order to completely fill the tank which would make it very awkward  to water all zones at the ideal time of the day which is very early morning.  Because of this we may want to increase the size of the tank in order for us to water zones 1 and 2  this morning one after the other and then  zones 3 and 4 on the follow morning.

If we assume that we will water zones 1 and 2 today and then zones 3 and 4 tomorrow then the calculation for tank sizes is below


Zone 1running for 30 minutes will use 1750 litres and zone 2 will run for 30 minutes and use 1250 litres.  So the total amount of water used in the 1 hour ( 30 mins per zone )  is 3000 litres.  In the 1 hour period the tank fill would have supplied 500 litres so would need a tank with a minimum tank size of 2500 litres

The example above is not a true example and only supplied as a guide as there are many other point to consider prior to buying a tank for watering the lawn.  Please do call or email our experts who will be happy to help or as an alternative please do use our free planning service

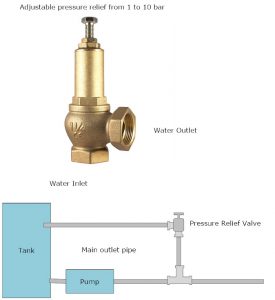
What Size Pump Will I need

If we look at the example above we can see that both zones 1 and 3 are using 3500 litres per hour.  As these have the highest volumes we will focus on these as the 2 smaller zones can if required have pressure regulators fitted.  So we know we need 3500 litres per hour and we know from the previous article that we need a minimum pressure at the spray head of 1.85 bar however the ideal pressure is 2.5 bar.  Something that we will not cover in detail here is friction so for this example we will assume a friction loss of .5 bar so we will need a pressure at the pump of 3 bar which will give us a pressure at the spray head of 2.5 bar.

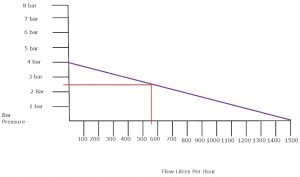
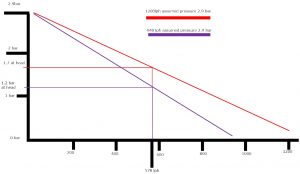
All pumps are supplied with a pump performance curve.  This curve will let you know what the outlet pressure from the pump is at a given flow.

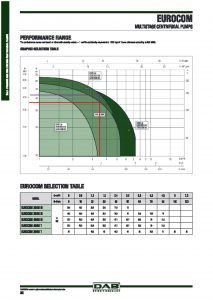
In the example above we can see 4 curves which represent various models of this particular pump supplied by the Italian pump manufacturer Dabs.  The horizontal line along the bottom shows the flow and the vertical line at the side shows pressure.  If we put a mark at the 3500 litre per hour mark and draw a straight line up we can see that the smallest model would be totally unsuitable for our application.  However if we follow the red line across we can see that two models fit our requirements and will deliver 3.5 bar at the pump or if we look at the purple line we can see that the larger pump in this family will deliver 4.5 bar when running with a flow of 3500 litres per hour

In this article we have not covered friction related to pipe sizes, fittings, filters, valves etc.  Soe of these will be to complex on very large systems so please do take advantage of our free planning service

How Many Pop Ups Can I Attach To Each Zone

Fingers crossed you have read the article that explains how pressure and flow effect the operation of a pop up and how pressure reduces as we use water.  If this is the case then read on if not then go back and read the first article.

We need to know how much water each pop up is using per hour and the amount of water pressure we have from our water source.  In the example below will assume we are fitting a pop up system to a small garden and we are going to run it from the mains water supply.  For large gardens we would probably use a tank and a pump.  This will be covered in a later article when we will explain to you how to decide what size tank you would need and the size of pump.  In the example below we will use a Hunter Pro Spray body combined with an Mp rotator nozzle as these are very cost effective, apply water very evenly and apply water slowly over a longer period of time making them ideal for low flow and low pressure applications which mains water supplies generally are.  On top of this the MP Rotator now accounts for about 85% of our pop up sales because of their leading spray pattern that applies water at 11mm per hour very evenly to the lawn .

Let us assume our water pressure is 4 bar and our flow from the tap is 1500 litres per hour.

lets now put this in to a simple graph

From the example above we can see that in order to maintain 2.5bar at the tap the maximum amount of water we can use per zone is about 550 litres per hour.  There are other pressure loses to consider however this goes beyond the scope of this article.  Please do take advantage of our free planning service if a more detailed plan is required.

Now we know what water we can use we can now see how much our MP Rotators are going to use per hour.  In this example we are going to assume we have a 10 metre by 8 metre lawn

We are using Mp 2000 nozzles set at 90 degrees in the four corners and in the middle we will use one MP1000 at 360 degrees.  From our mp rotator chart we can see that the mp 2000 rotator nozzles are using 74 litres per hour and our Mp1000 at 360 degrees is using 161 litres per hour.  This gives us a total of 457 litres per hour and if we pop this on to our chart we will see that our water pressure at the tap will be close to 3 bar.  From this we can assume depending on the pipe layout etc that we will probably be maintaining 2.5 bar at the MP Rotators spray head so it is well within the scope of pop up operation.  To view the mp rotator water usage guide please click here

Before You Start Planning Your Pop Up Watering System

Pop up watering systems for lawns can be a very cost effective way to keep your lawn in tip top condition.  However before you start there are a few essential point that you must consider.

How does a pop up work

Almost all pop ups are water powered.  The body of the pop up stays in the ground and when the water flows the central riser is pushed up by water pressure.  When the riser reaches the top a wiper seal is forced out and prevents any water passing between the riser and the body.  The wiper seal needs a minimum water pressure in order to be forced out and make the seal between the riser and the body.  On most pop ups this is about 1.85 bar pressure.

What happens to water pressure as we use water

Water pressure in a mains supply is normally measured as static pressure.  What this means is that when you read the water pressure you should make sure that every thing is off and that no water is being used.  This is called static water pressure.  For most houses in the UK you static water pressure would be about 3.5 bar however pressures can be as high as 10 bar and as low as 1.5 bar depending on your location and the condition of the water pipes running to your house.  As we turn on taps etc and the water starts to flow we will see the water pressure drop.  The more water we use the lower the pressure will fall.  A typical house in the UK will have a flow from the water main of about 1200 litres per hour however this can vary down to as low as 600 litres per hour and up to 2000 litres per hour or more.  Below is a chart which will give you an idea of how the amount of water we use reduces water pressure.  We would normally produce readings at various flows in order to make the graph more accurate however in this example we have used a straight line

We can clearly see from the graph below that our pressure will drop based on the amount of water we use.  In other words the amount of water spraying out of the nozzle.  On top of this the range of the spray from the pop up will vary depending on the pressure at the nozzle.  All pop ups have what we call a sweet spot.  In other words an ideal working pressure and this will be explained later on

The All New Caddy Web Based Irrigation Control

Irrigation Caddy 

irrigation-caddy-2

Web based irrigation control makes monitoring and controlling your irrigation systems very easy from any location World Wide

The all new irrigation Caddy has all the basic features found in traditional irrigation control units plus many more benefits that make programming and control of complex watering systems simple.  The unit can connect directly to your PC, Smartphone, Ipad and providing the unit has access to wifi you can change watering times, monitor watering flow  etc

The key features of the Irrigation Caddy

  • Made in the USA
  • Comes with 10/ 11 zones which can be expanded to 43 zones The 11th zone can be used to control a zone or can be used to operate a master valve or pump start relay
  • Standard 24 volt ac Output so compatible with industry standard solenoid valves
  • Manual override on unit
  • Connects to local weather and will adjust watering times based on weather conditions
  • Water flow meter can be attached so that the amount of water applied can be monitored per zone
  • Zones can have names so rather than zone 1 you can change the name to front lawn or similar
  • Ethernet enabled so you can plug the unit straight in to router or pc
  • Rain sensor port
  • USB port
  • Water usage logging
  • Web security password protected
  • Graphical calendar